
When we connect an Ubuntu desktop with a WiFi or wired connection, we might face issues with the Internet Protocol address as it can change dynamically every time. If you are using the network only for that device and for browsing and other services without sharing or communicating with other devices, then there is no need to change anything. However, if you want to share your system over SSH, SFTP, and more services, then the dynamic option is not good. In such cases, we need a static IP address. In this tutorial, we will set a static IP on an Ubuntu system.
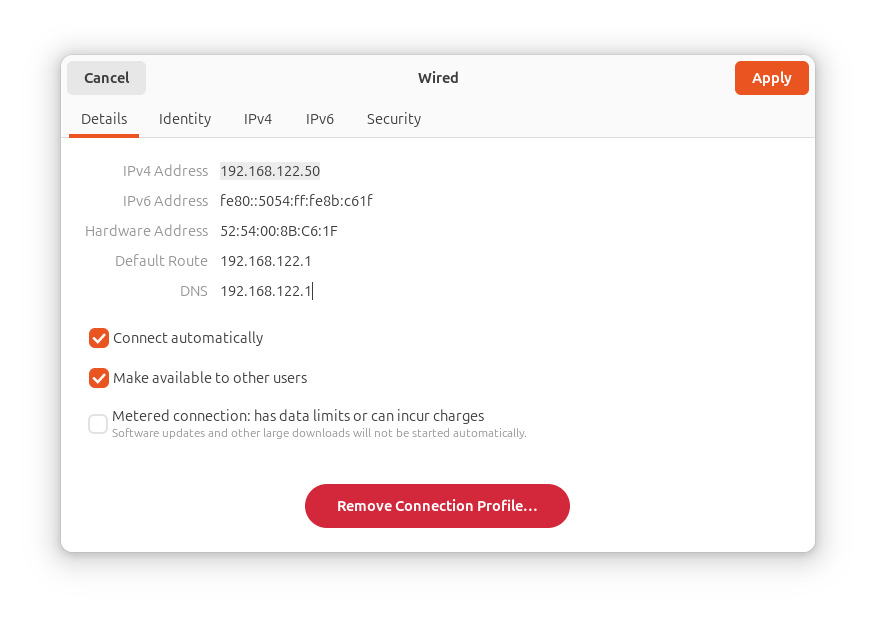
On Ubuntu or another operating system connected to WiFi and wired connections, the DHCP connection is available by default. DHCP connection always changes the IPv4 address after restarting the device. To set up a static IP, first, open the settings on the Ubuntu desktop. Now open the networking tab. Inside the networking tab, select the current connection. Inside the connection, there is a small setting icon; click on it to open the Networking details window. Inside this window, you can see the Networking details tab. Here, you will find your IP address, Default Route, and DNS details.
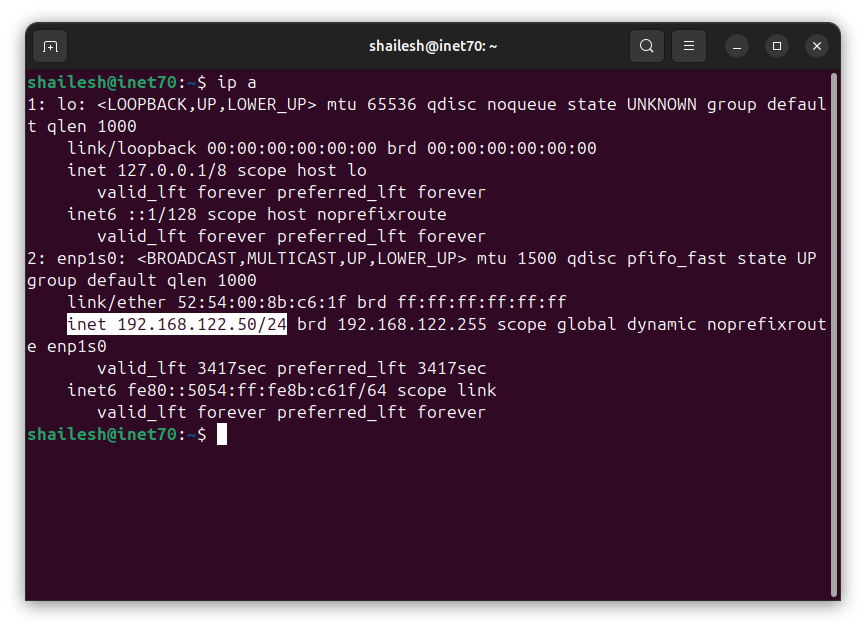
Now go to the Networking tab, where you will see that your current internet connection is DHCP. We need to change it from DHCP to Manual. Here, we need to input all the configuration details manually. For the IP address, open the Terminal and input the ip a command to show your connection details. From the screenshot, you can see my public IP address is 192.168.122.50/24 and my networking hardware details. To set the static IP address, there are 255 possibilities. You can set your public IP address like 192.168.222.1-255. From the last three-digit code, you can enter 2 to 255 for your public IP address. In my case, I use 192.168.122.70 as a public IP address.
Now, jump to the next step for adding the subnet. Setting up the Netmask is complicated but easy. In my case, my current IP address checked on the terminal is 192.168.122.50/24, so I use 255.255.255.0 as the Netmask for 192.168.xxx.xx/24. It’s different according to your last digit. To check your subnet, visit the following platform to check and use according to your networking. Now add the routing for our internet connection. To check your route, switch back to the Networking details. From this tab, you can copy and paste your Route and DNS both. Save all your settings and exit from the settings. Now just turn off your internet connection and turn it on or reboot your system. You will see your static IP address for your Ubuntu desktop.
Thanks for reading this article. You can support my blog with a small contribution to get more content and services like this.


